Thinking about tackling an electrical subpanel installation? You’re in the right place. Whether you’re a Billings homeowner adding a workshop or a Bozeman business owner expanding, this guide covers everything.
We’ll explore reasons for needing a subpanel, considerations for picking the right one, and steps for safe installation.
Electrical subpanel installation is a substantial job. With planning and an understanding of electrical safety, you can do it.
Get ready to rev up your power independence! Tired of unsustainable energy habits? Break free with YellowBall Electric + Generators!
Our consultation team is ready to listen, understand your needs, and craft a sustainable energy plan that’s uniquely yours.
Why Consider Electrical Subpanel Installation?
Outgrowing your main breaker panel is common. We’re acquiring more power-hungry devices and appliances.
A subpanel acts like a mini breaker panel. It draws power from the main panel and distributes it to a specific area.
Common Reasons You Might Need a Subpanel
- Overloaded Main Electrical Panel: When your main service panel is full, a subpanel lets you expand.
- Remote Locations: Garages, workshops, or additions benefit from a dedicated subpanel.
- High-Power Appliances: Some appliances need 220V circuits. A subpanel helps avoid overloading the main electrical service.
- Improved Safety: Separate circuits for different areas improve safety and troubleshooting. A detached garage subpanel isolates garage issues, keeping the home safe. Installing a subpanel in a remote location may be needed for equipment grounding.
Planning Your Electrical Subpanel Installation
A critical decision is picking the correct amp subpanel with enough breaker spaces. You want the proper size subpanel without overspending.
Sizing Your Subpanel
For modest electrical needs, a 60-100 amp subpanel is often sufficient. For larger setups, such as workshops or home additions, a 100-150 amp subpanel is generally recommended.
For high-power demands, such as larger homes or heavy equipment, a 200-amp subpanel may be necessary.
A 100-amp subpanel with 24 spaces is a common choice, offering enough room for standard breakers and some tandem breakers, providing flexibility for future needs.
The National Electrical Code (NEC) refers to these as “panelboards.”
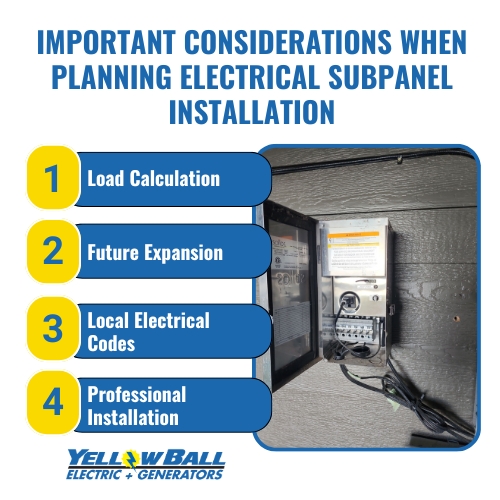
Important Considerations When Planning Electrical Subpanel Installation
- Load Calculation: Accurately calculate the total electrical load to determine the correct subpanel size. This involves accounting for the wattage or amperage of all devices and appliances that will be connected.
- Future Expansion: Plan for potential growth by selecting a slightly larger subpanel. This ensures room for additional circuits as your electrical needs evolve.
- Local Electrical Codes: Always adhere to local electrical codes and regulations, which may have specific requirements for subpanel sizing and installation.
- Professional Installation: Consult with a licensed electrician to ensure the subpanel is sized, installed, and compliant with local codes.
Planning your electrical subpanel installation requires careful consideration of your current and future needs.
At YellowBall Electric + Generators, our licensed electricians are ready to help you determine the right subpanel size and ensure a safe, efficient installation tailored to your unique requirements.
Electrical Subpanel Installation: Step-by-Step Guide
Installing a subpanel takes careful planning and attention to detail. Think about where you’ll place the subpanel, what it will power, and its specific requirements.
Check the panelboard specifications for more detailed information.
Step 1 & 2: Location and Mounting
- Pick a dry, easy-to-access spot with at least 30 inches of clear space in front.
- Secure the subpanel box to the wall firmly.
Step 3: Choosing the Feeder Wire
- Calculate the total amperage the subpanel will need.
- Use the NEC ampacity tables to find the right wire size and insulation type (like THHN, THWN, or THWN-2).
- If unsure, choose a slightly larger wire to be safe.
Step 4: Grounding and Bonding
- Proper grounding is essential for safety. Use an approved copper wire of the right gauge to connect the ground rods to the subpanel’s ground bar.
- Bonding of the neutral and ground wires happens only at the main service panel, following NEC rules.
Step 5: Connecting the Feeder Cable and Ground Wire
- Attach the hot feeder wires and, if needed, the neutral wire to the correct terminals.
- Securely connect the neutral and ground wires to their respective bars in the subpanel.
- Double-check that grounding and bonding are set up correctly.
Step 6 & 7: Adding Circuit Breakers and Wiring Circuits
- Install circuit breakers sized appropriately for each circuit (e.g., 20 amps, 30 amps).
- Label the wires and breakers clearly for future maintenance.
Step 8: Inspection and Testing
- Compare all wire sizes to the NEC ampacity tables to ensure they meet requirements.
- Test each breaker for proper function and check that the grounding resistance is below 1 ohm.
Step 9: Final Connections and Power-Up
- Turn off the main panel’s power and lock it out before connecting the feeder wires.
- Connect the feeder wires to the main service panel or another panel, such as in a detached garage.
- Turn the power back on and verify that the subpanel is working as expected.
By following these steps, you can ensure a safe and efficient subpanel installation. However, electrical work can be complex and potentially dangerous if not done correctly.
That’s why it’s important to contact a licensed electrician, like the experts here at YellowBall Electric + Generators, to handle your installation safely and ensure everything meets code. Reach out to us for professional assistance and peace of mind.
FAQs about Electrical Subpanel Installation
Do I need an electrician to install a subpanel?
Local electrical codes vary, but licensed electricians are often required for subpanel installations. This is due to safety risks and panelboard bonding requirements.
Consult your local jurisdiction to confirm specific rules and bonding requirements for all buildings on your property.
An inspector can ensure safety, regardless of whether you install it yourself (if permitted) or hire a professional.
How much does it cost to have a subpanel installed?
Subpanel installation costs range from $500 to $2,000. Factors affecting cost include regional labor costs, subpanel amperage and size, and the number and type of circuits.
How far can a subpanel be from the main panel?
Distance limits between the main breaker panel and a subpanel are determined by NEC ampacity standards, not a set distance.
These standards prevent voltage drops, which can cause malfunctions and fire hazards. Consult the NEC ampacity chart.
Does subpanel wire need to be in conduit?
Conduit enhances safety and durability. Local building codes specify conduit requirements, such as EMT, PVC, or Liquidtight.
Consider what conduit connectors (like LB conduit fittings) you’ll need for your setup.

Your Go-To Guide for Electrical Subpanel Installation Success
Electrical subpanel installation is a critical step in expanding your home or business’s electrical capacity safely and efficiently.
From understanding when and why a subpanel is needed to properly sizing, grounding, and wiring it, careful planning ensures success.
While this guide provides a comprehensive overview, electrical work requires precision and compliance with local codes.
For a seamless and professional experience, trust the experts at YellowBall Electric + Generators.
Whether you’re upgrading, expanding, or planning for the future, our team is here to handle your electrical subpanel installation with expertise and care.
Contact YellowBall Electric + Generators today to power your next project!